Sunday, February 12, 2012

Braised pork belly with soy sauce

Pork belly - delicious, fatty, cheap.

Bacon lovers love it. Foodies love it.

It's hard to get really right, though.

This comes from a dinner party I had recently where I finally took the effort to plate things nicely for my diners. It was appreciated by all and the food was completely delicious. Almost as delicious as it looked. The sweet potato puree offset the fattiness of the pork well, and the bean sprouts on top worked great with the asian flavors.


Braised pork belly
Adapted from Seasaltwithfood.com

2 1/2 to 3 lbs Pork Belly, cut into big chunks ( 3 to 4 inch)
1/4 cup Brown Sugar
4 cups Water
1/2 cup Sake
1 1 1/2 inch Ginger, bruised
5 stalks Scallions
5 Tbsp Dark Soy Sauce
3 Tbsp Light Soy Sauce
1/4 cup Mirin


Bring a large pot of salted water to boil. Blanch the pork belly for 15 minutes. Drain and make sure to get rid of any impurity.

With a large pot, combine the water, sake, mirin, light and dark soy sauce, ginger, sugar, scallions and the pork belly. Bring it to a boil.

Then simmer on a low heat for about 2 to 2 1/2 hours. Adjust the seasoning. Serve immediately

Photos by Ben : heliotrope.ucsd.edu

Friday, November 25, 2011

Frustrated scientist turns to cooking!: Elegant Thanksgiving leftovers

Frustrated scientist turns to cooking!: Elegant Thanksgiving leftovers: This year, we made a really delicious turkey. Which, of course, was fantastic at the time, but lead to virtually no leftover turkey at all. ...

Photos by Ben : heliotrope.ucsd.edu

Elegant Thanksgiving leftovers

This year, we made a really delicious turkey. Which, of course, was fantastic at the time, but lead to virtually no leftover turkey at all. With the center of my gobbler sandwich missing, what could I do with the rest of the leftovers?

So I pilfered some mashed potatoes, some brussel sprouts, green bean casserole, and a few scraps of white meat from dinner last night. Alone, the textures, when combined, make a whole lot of squishy deliciousness. But us humans are prone to enjoying varied textures, so I knew I needed to add something. Arugala for a crisp peppery bite, grape tomatoes for their juicy toothsomeness, an egg because everything needs eggs. I also made a sauce of canned cranberry sauce mixed in equal parts with BBQ sauce for a little zip.

The results were delicious and beautiful for dinner the night after Thanksgiving. It tasted vaguely like turkey-day fare, but different enough to be a new experience.


Pan-fried potato patties with Thanksgiving fixins
1. Scrounge up leftovers.
2. Squash leftover mashed potatoes into a patty with rosemary and brussel sprouts. Roll in bread crumbs. Be careful! They're very delicate!
3. Pan fry in a little bit of butter until browned on both sides.
4. Fry an egg with a little rosemary.
5. Stack all ingredients as chefly as possible on a plate and enjoy!

Thanksgiving is about cooking as much as the day after is about NOT cooking, so this is simple and quick and relatively light.

Photos by Ben : heliotrope.ucsd.edu

Sunday, October 23, 2011

Bacon-rosemary kettle corn? Yes, please!

What does one do after telling her fiance that she would be able to feed the two of them on the 80 dollars worth of groceries she bought for a week and a half? And then realizes she has forgotten dessert?

Answer : Ben the master kettle corn maker to the rescue!


For some reason, kettle corn making completely eludes me. Every single time, I end up with a stinky burnt mass of semi-popped corn. Man Candy, on the other hand, is some kind of popcorn wizard; this is greatly appreciated by a reluctant dessert-maker such as myself. One of the best things about popcorn is that it is completely customizable. You can toss almost anything you want in with it and come out with something that is at least sort of edible.

So kettle corn. The delicious stand-by dessert.

Bacon/rosemary kettle corn
Serves 2? 3? 4? Makes a medium bowl of popcorn.


  • 1/2 Cup popcorn (not popped)
  • 1/4 Cup oil (we use canola)
  • 1/3 Cup sugar (we use half white sugar, half raw sugar for crunch)
  • 2 strips bacon, sliced into little pieces
  • Bunch of rosemary, to taste
  • 1/2 tsp salt
In a large pot, over medium heat, cook bacon til crisp. Remove and pat to get rid of excess oil. To the pot, add the oil, popcorn, and sugar. Heat, stirring frequently, until you hear the first few pops. After you hear them, you have to shake the pot. Shake it for a couple of seconds, then return to the heat for about 10 seconds. This is how man candy stops it from burning. When it's about done, add in the bacon, rosemary, and salt.

DEVOUR.


Photos by Ben : heliotrope.ucsd.edu

Friday, June 10, 2011

Goal : 3 photos in 4 weeks on foodgawker

Foodgawker, I'm coming to get you. My challenge for myself in the next month or so is to hold off on eating my food until I can style it and get a great photo. Three photos on foodgawker in the next month. Lets see what we can do!

Photos by Ben : heliotrope.ucsd.edu

Thursday, June 9, 2011

Birthday dinner!

What does a amateur chef want to do on her birthday? I'll give you one guess.

Entertain! Feed people!

So when I turned 27 a few weeks ago, I did just that. As the recent recipients of a new-to-us immersion circulator rescued from near destruction as lab surplus, we've been going through a bit of an... experimental phase. Anything that fits in a baggie is fair game these days. Eggs? Check. Like custard. Chicken? Check. Lamb? Check. 

Check check check.

But duck? Such a fatty meat surely has no problem remaining moist with traditional cooking methods. But this is my birthday, and I say we try it out.

2 hours at 150F later, a hot pan to sear in, and a sprinkle of simple salt and pepper and we have it : our sous vide duck thigh.


So, you ask, how was it? Well, to be totally honest, I think I hate duck. But it does make for a very pretty plate :)


Photos by Ben : heliotrope.ucsd.edu

CSA tuna salad

Simple, healthy weeknight dinner ideas can be hard to come by. We picked up a CSA box Tuesday, and it was kinda sparse! I was a bit let down, but the arugala in that box is... to die for. It's peppery, with almost a buttery taste. I decided to pair it with some grape tomatoes and red onions for a delicious, lemony salad topped with a herby tuna salad.


Arugala salad :
Few cups washed and dried arugala (a couple of hefty handfuls will feed 2)
10 grape tomatoes per salad
Thinly sliced red onions
Onion sprouts
Homemade croutons (cut up leftover bread, toss with olive oil, pepper, salt, and italian seasonings, grate a little parmesan, and bake at 300 until crispy - about 20 minutes)
Juice of 1 lemon
1 Tbsp olive oil
1/2 tsp fresh ground pepper
1/2 tsp sea salt
1/8C Fresh grated parmesan

Toss veggies with lemon juice and olive oil. Season with salt and pepper, and stir in grated cheese. Add in croutons before serving so they don't get soggy!

Cilantro tuna
2 cans solid white tuna fish
1.5 Tbsp mayo
Salt
Pepper
1/4 cup chopped cilantro
1 stalk sliced green onions

Drain tuna well, and smush up with a fork. Add mayo and mix well. Stir in cilantro and onions. Season with salt and pepper.


Photos by Ben : heliotrope.ucsd.edu

Monday, May 16, 2011

Quick and easy breakfast cups

SCMBA - Self-contained morning breakfast apparatus.
That's what these breakfast cups end up being, and I make them all the time. They're easy, delicious, and have the perfect balance of what we call Swavery. Sweet/savory.

You should try them ASAP.


 Sunday breakfast cups 
For each breakfast cup you will need:

  • 1 large egg
  • 1 slice bacon
  • 1 large slice bread, or 2 smaller slices
  • Half slice of your cheese of choice... we go with cheddar a lot of the time
  • Drizzle of maple syrup
Here's the slightly tricky part. In a large muffin tin (the kind that makes 6 big muffins), spray the muffin holes you're using with non stick spray. Using a cup that juuuuust fits into the bottom of the tin, cut out a circle of bread. Place into the bottom of the muffin hole. Take the slice of bacon and wrap it around the inside of the muffin hole, making a cup for the egg. Crack the egg into the hole. Top with a second round of bread, this one a little bigger. Drizzle on some maple syrup, and top with pieces of cheese. Bake at 350 for 20 minutes (for an egg cooked all the way through) or 18 minutes for a more squishy type egg.

Enjoy!


Photos by Ben : heliotrope.ucsd.edu

Thursday, April 21, 2011

Oven fried coconut squid with mango-lime-cilantro salad

This is an example of fortuitously having some weird ingredients in my pantry, and wanting to use some of them up. So what do you make when you have squid, dessicated coconut powder, tons of cilantro, a couple of ripe mangos, and some long-living green beans?

Salad:
2 ripe mangos, cut into chunks
1/2 red onion, sliced thinly
1 largeish lime, juiced
1 bunch cilantro, diced coarsely
1 inch ginger, grated
1 jalapeno, deseeded and diced
several baby carrots, grated
2 tbsp dessicated coconut powder
2 tbsp rice vinegar
2 tbsp honey
Handful green beans, chopped into roughly 1 inch sections

Directions: Toss everything together well, and let sit for at least 30 minutes to let flavors meld.


Oven fried coconut squid
1/2 lb tubes and tentacles (sounds so nefarious, but the tentacles are so key in getting that crunch factor!
1 egg, beaten
1 cup panko bread crumbs
2 tbsp dessicated coconut
1tsp sea salt
Chili sauce (we used Grandma's from Whole Foods, which goes SUPER well with squid)

Directions: Preheat oven to 350F. Spray a non stick baking sheet well with olive oil, or really whatever cooking spray you have handy. Combine dry ingredients in a shallow bowl. Toss squid into the egg after rising well and patting dry, and coat well. One by one (this is important for mega crusty goodness), pat the squid into the bread crumb mixture and transfer to the baking sheet. When you're done, give the tops a good spray with oil, and pop in the oven until golden brown and crispy, about 10-15 minutes.

Serve with coconut-lime rice and ENJOY!


Photos by Ben : heliotrope.ucsd.edu

Sunday, October 24, 2010

Quick, tasty breakfast

It's been rainy lately in San Diego, which is unusual. Since I melt when water touches me, we did our weekly long bike ride indoors on Saturday. Afterwards, there were tons of errands to run, and we needed nourishment.

What's a chefgirl to do? Whip up some fancy scrambled eggs. Use up some turkey sausage patties that I was literally paid to take from the supermarket, mix with some fresh organic veggies, some random cheese, and a slice of rye toast.

The result? A mixture of organic and about as unorganic as you can get; a truly yummy mixture.


Couple of drops of sriracha for flavor :)


Photos by Ben : heliotrope.ucsd.edu

CSA beet experiment : Magenta risotto!

I joined a CSA a few weeks ago. Just a two-box trial to see if I'd use the variety and to make sure it suited my grad student poorness. Turns out, a CSA is a FANTASTIC way to learn about new tastes and textures that you might never otherwise pick up at the supermarket.

Take the beet, for example. In the past, I had decided they taste like sweet red dirt and pretty much ruled them out as human food entirely. But this box had a whole lot of beets in it. I take that challenge, CSA.

So I made a beet risotto. The color was out of this world, and the taste was even better. I suggest you try it out!

Beet Risotto with goat cheese
Serves 4 large portions


For the beets :
6-8 small beets
2 Tbsp olive oil
1 Tbsp crushed garlic
Few sprigs fresh thyme
Few sprigs fresh rosemary

For the risotto :
2 Cups arborio rice
2.5 Cups warm beef stock
1 Tbsp olive oil
2 Tbsp butter (salted)
6 cloves garlic
1/2 Cup onion sprouts (used because I didn't have any onions)
Splash heavy cream (or greek yogurt, which would work great)
Goat cheese
2-4 slices thick cut bacon

Reserve 2 beets for chips. With the rest, if they are large, cut them into smaller pieces. Wrap pieces in tin foil and bake at 450F for about an hour, until tender.

Meanwhile, wrap each piece of bacon around a knife, forming a spiral. Bake, turning frequently, until crispy. Slide off the knife and set aside. With the remaining bacon fat, slice the 2 beets you set aside into very thin slices. Place them in the bacon fat, and stick them in the oven. You'll have to be careful at this point, as I burnt about half of my beet slices. Turn them often so they don't turn to beet charcoal.

In a heavy pot, add 2 Tbsp olive oil, the crushed garlic, and minced rosemary. Sautee for a couple of minutes until fragrant and softened. Remove from pot and mush with mortar and pestle until formed into a paste. Add fresh thyme to this. Reserve for later.

In the same pan, add 1 Tbsp olive oil, and your remaining garlic. Lots of garlic. The more the merrier. Sautee until lightly brown, then add butter and onions. Push around the pot for a few minutes. Add rice. Stir the rice in the olive oil butter mixture to coat all of the grains. Cook this way for about 5 minutes, toasting the rice gently. Add 2 Cups stock and bring to a boil. Reduce heat to medium-low and simmer, adding 1/4C stock when the rice gets dry. Cook until al dente, and then add a bit of goat cheese and a splash of cream.

With the roasted beets, peel them by pushing the skin off by hand. After roasting, it'll come off easily. Chop half the beets into small pieces, and the rest puree with the mortar and pestle, or with a blender/food processor. Add the olive oil/garlic/rosemary/thyme mixture to the pureed beets and stir into the risotto well. Stir in the chopped beets, and plate the risotto.

Top with bacon twill, goat cheese, and I also added some microbasil that the CSA gave me. Beautiful dinner, and totally delicious.


Photos by Ben : heliotrope.ucsd.edu

Tuesday, August 31, 2010

Cauliflower soup with crostini

Seriously one of the most healthy and yet ridiculously awesome recipes I've ever come across. Cheap, too! And EASY!

Cauliflower soup
Serves ~4 hearty servings


  • 1-2 onions, diced roughly
  • 6 cloves garlic, chopped
  • 2 medium heads cauliflower (or mix cauli/broccoli) chopped into smallish pieces
  • 4 cups chicken broth (or water, or beef broth, or veggie broth, anything you want really)
  • 2 Tbsp butter
  • Milk to cover (or soy milk, or no milk)
Melt butter in big pot over medium heat. Toss in chopped onions and garlic and let come to the point where they are all translucent, but not browned. 

Throw in cauliflower or broccoli or both, and maybe some potatoes. Stir in with onions and garlic for about 10 minutes. Pour in broth and fill with milk, or nothing, until the veggies are covered.

Bring to a boil, then reduce to medium-low heat for about 30 minutes. Allow to cool some. Blend in blender in batches until it's about 90% blended, and add whole pieces for the rest, for some texture. Eat.


Photos by Ben : heliotrope.ucsd.edu

Friday, August 27, 2010

Lemon-macadamia vegan cupcake experiment.

Props to Michelle, my eclectic weirdo of a friend who baked us cupcakes during out impromptu dinner party/motha sauce extravaganza last week.


I doubted the vegan cupcake idea, I really did. In my mind, cupcakes are flour, egg, oil, milk and sugar. But hey, lady changed my mind! These were dense, moist, and DELICIOUS.


Photos by Ben : heliotrope.ucsd.edu

Tuesday, August 24, 2010

How I overcame my fear and learned to love the bread

Since I love bread SO much, I have some serious reverence for good bread. And a lot of the time, that means I end up paying a premium for the bestest bread. Why do I do that? Because baking, unlike cooking,  requires you to follow a strict set of directions. And directions and I do not get along. Usually when I bake, I end up making one dumb decision and mucking up the whole batch.


One time, I decided to make cookies. In the process, I added a little bit of 99 apples. Also known as apple schnopps. Why? Because apple is yummy, right? Well the cookies would have been great if they didn't taste exactly like an apple jolly rancher. Gross. And then there was the time I decided I could substitute a lot of the fat in brownies with pudding mix. Those ones had the texture of a Sham WOW! Seriously. Once we discovered you could eat them frozen, it was ok... but man, warm or at room temperature, those were some seriously bizarre brownies.

So you can see my dilemma. Why mess with something that is already so perfect? Little by little, I started adding baked stuff into my repertoire. Popovers came first. So innocuous. Blast the ingredients in a blender, pop in the oven, and bam, you gots some popovers.

Pizza dough came next, which morphed into bread sticks. A huge hit. Also very easy.

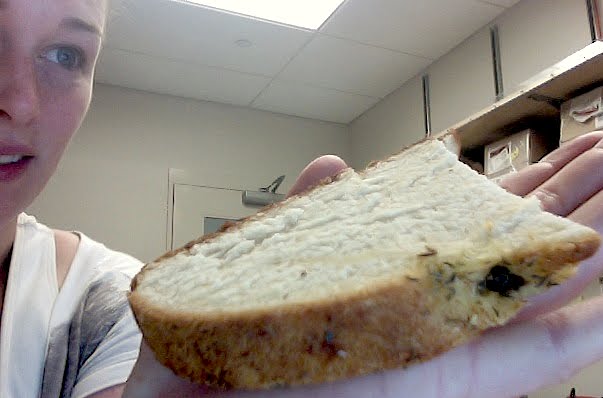
Project bread started on Sunday, during mothersauce meltdown. I made a rosemary olive oil no knead bread that was extremely fluffy, but devoid of any salt (oops) and thus lacking in the flavor department.

Finally, I solved the mystery. Last night, I got an arm workout and a half making this loaf of bread. And omg it's like real bread!


Herby bread with parmesan scroll
Serves 1 Amy

  • 1 Cup warm/hot water
  • 1 Tbsp honey 
  • 1/4 cup olive oil, plus extra for topping
  • 3 2/3 cup flour
  • 1 Tbsp garlic powder
  • 1 Tbsp active dry yeast
  • 1/3 cup parmesan cheese (grated)
  • 1 heaping teaspoon salt
  • Chopped thyme
  • Black pepper
  • Mustard powder
  • Other herbs of your choice (I used some rosemary from my baby herb garden)
Mix water, honey, and yeast well in a big bowl. The honey will cause the yeast to start foaming, and you want to wait for this to happen before adding anything else. It'll probably take 5 minutes. Add in 1/4 cup olive oil, along with garlic powder and salt. Mix well, and add in flour 1/2 cup at a time, mixing well.

The dough will now be kind of piecy. Lightly flour your surface, and knead the dough for about 5-8 minutes. Add more flour if it's really sticky, but stop kneading before dough gets hard. 

Spray the big bowl you made the dough in with some kind of oil spray and place the dough ball in the bowl. Put in a warm place until dough has doubled, about an hour. You can preheat your oven to 450F at this time, and if your dough isn't rising, put it on top of the oven. It'll work, trust me.

Fortunately for me, I was making mac and cheese with leftover beschamel at the time, and cooked bacon in one of my baking pans. I took out most of the bacon fat, but didn't clean the pan. I took the big ball of dough and spread it slightly flattishly. I spread the parmesan cheese on the surface, and folded in the edges. Placed the ball, seam-side down, in the bacon pan. Made a mixture of olive oil and herbs, and brushed the top liberally. Then I cut an x over the top of the loaf and baked for 30 minutes. I spritzed water into the oven every few minutes, but I don't know if that made a difference. 


Anyway, long story short, there's only half a loaf left. If I can get a camera to it before my mouth makes it there, I'll post a better photo than the one I took with my laptop. Oh, and bacon bottom tastes AWESOME!

Voila. I did it!


Photos this time obviously NOT by Ben : heliotrope.ucsd.edu

Mother Sauces from 1975 part 1

Being the burgeoning culinarian that I am, I thought it'd be important to know the basics. I mean, knife skills, meat prep, sauces... all important. And best thing about it is that once you learn a skill the proper way, you can basically tweak it any way you want to make it your own. Wish I'd done that!


Anyway, so boyfriend's lab mate, Vaibhav, loves good food. He also loves to cook, but wants to learn to cook things better and do other things better too. I can dig that. So we decided to make the thing I considered the holy grail : the French MOTHA SAUCES. 


Now, boyfriend and I developed an unhealthy obsession with truffle oil on Valentine's day, when we did a triathlon and then made the most unhealthy truffled mac and cheese on the face of the planet. It was my first time making a beschamel, and it was memorable to say the least. We ate it out of the baking pan, and got drunk on special beer, and it was awesome. Triathlon in the morning cancels out all bad eating for the rest of the.... week, right?


I digress. So mother sauces. Traditionally, wikipedia tells me there are 4. Or 5. 


Beschamel, based on milk, thickened with a white roux
Espagnole, based on brown stock, thickened with a brown roux
Veloute, based on a white stock, thickened with a blonde roux
Allemande, based on veloute, is thickened with egg yolks and heavy cream


and we added mayonnaise, because it's awesome and easy.


Oh, and we made fresh baked bread. Mmmm.


Espagnole Sauce
Serves about 10 people or so

  • ¾ pint (420 ml) of brown meat stock
  • 1 oz (30 g) of butter
  • 1 oz (30 g) chopped streaky bacon
  • 1 chopped carrot
  • 1 chopped shallot
  • 4 tbsp of chopped mushrooms
  • 3 tbsp of flour
  • 2 tbsp of tomato purée
  • 1 bouquet garni
  • salt and pepper


  1. Place the butter in a large saucepan and heat gently until it melts.
  2. Add the chopped bacon and cook for 2 minutes.
  3. Add the chopped vegetables and continue to gently fry all the ingredients until the vegetables have softened.
  4. Remove the pan from the heat and stir in the flour.
  5. Return the pan to the heat and cook the flour mixture (roux) until it turns a dark brown colour. Do not allow it to burn.
  6. Remove the pan from the heat and whisk in the meat stock a little at a time.
  7. Continue to stir the sauce continuously until it thickens and then add the tomato purée, the bouquet garni and season with salt and pepper.
  8. Reduce the heat and simmer very gently for about an hour.
  9. Skim the top of the sauce from time to time.
  10. When the sauce is ready, you should have a thick brown strong-tasting sauce. Strain the sauce into a new pan through a sieve so that only the liquid passes through*
* Evidently I missed this important step, so mine tasted a lot like a mixture of baked bean sauce and Chunky beef stew. You should probably just do it.

Beschamel Sauce
Serves 10 or so

  • 2 Tbsp butter
  • 2 Tbsp flour
  • 1 Quart milk (1% doped with cream, or whole) 
  • 1/2 cup white wine
  • Handful shredded parmesan
  • 1 Tsp crushed mustard seeds 
Melt butter slowly over low heat. Add in flour, and stir well. Cook, stirring often, until the roux turns slightly darker in color. Pour in milk and bring up to a simmer. Whisk well, until all lumps are gone. We then added the parmesian, crushed mustard and white wine. Season with salt and pepper.

Whew, tired hands. More to come soon!

Photos by Ben : heliotrope.ucsd.edu

Monday, August 16, 2010

The perfect BLT requires the perfect bread!

Lets face it - we all love the humble BLT. It's got the toothfully yielding texture of a great bread, spread thinly with mayonnaise, crispy greens, succulent tomato, and the star, thick-cut smoked bacon. Fatty, crispy, salty... everything delicious in a simple package.

What can augment this singular masterpiece? The perfect slices of bread. In this case, I used a gruyere and chive bread that I brought back from Con Pane this past weekend. The result was... uuuunh.

Boyfriend says it rivals his grandfather's BLT.

It's a great, quick weekday dinner.


The Perfect BLT
Serves 2

  • 4 slices thick cut crusty bread, very lightly toasted
  • 6 slices hickory smoked, thick cut bacon
  • 2 large handfuls fresh spinach
  • 2 Roma tomatoes
  • 2 Tbsp mayo
Cook bacon in the oven at 450F until crispy. Wrap in several paper towels and squeeze the grease out. I find this leaves the bacon much less greasy than letting it sit on paper.

Spread 1 Tbsp mayo on 2 slices of bread. Pile on a handful of fresh spinach (no WAY will you use frozen spinach in this!) on top of the mayo so it sticks. Slice the roma tomatoes thickly, and spread slices on top of the spinach. Layer on 3 strips of bacon on each sandwich, and slice in half.

I barely got a photo in before boyfriend DEVOURED it.


Photos by Ben : heliotrope.ucsd.edu

Sunday, August 15, 2010

Trip to the Breadstaurant!

Note : this is a review of Con Pane Rustic Breads and Cafe in Point Loma, San Diego. Fueling my bread obsession one obscenely large slice at a time.

I am a breadophile. A bread monster. When I go out for dessert, I am usually sad it's not a loaf of bread. One time, I tried the South Beach diet and I almost slit my wrists.

So you can imagine how HAPPY I was when I found out there's a breadstaurant and it's only like 20 minutes away!!! Ok that second part makes me kinda sad, but it might be for the best. Nothing worse than blowing up like a blueberry from eating pound after pound of delicious, soft, crusty, amazing.... I digress.
 
For two of us, we ordered the savory bread basket thingie, a giant piece of chocolate bread, and focaccia OTD. With 2 coffees (including boyfriend's finnicky espresso drink), it came to about 16 bucks. Say whaaaaaat?

Bread basket - I knew I was in trouble when this arrived. It was a literal leviathan of bread. See photo. Each piece had the square inchage of a small fedex box. Had the chive and grueyere, multigrain, and rosemary and olive oil breads. Came with delicious pesto and some other things that don't make it into my memory radar.

Chocolate bread - you are a curious creature. Maybe you can't decide what you are, but I like you anyway. Soft, chocolatey, and kinda a little sour on the aftertaste. Yummy.

Focaccia - Gorgonzola, walnuts, and red onion. If you think I flip my shiznat for bread, wait til you see what I do for gorgonzola! The only problems with this bready thing was that the walnuts pissed me off, and everything jumped off the bread when I bit into it. Boyfriend admonished with a "use a damn knife and fork you heathen" or something.

Con Pane, you should be getting 5 stars. Delicious bread, badass interior, cool lights... good coffee. But you can't have it for a couple of simple reasons.

For ONE : why is your menu located behind tables not anywhere near where you order? You wait in a long line just to realize the reason it's so slow is cuz NOBODY has looked at a menu yet because there simply isn't one to look at!
For TWOLY : Um... you should probably ask if I want my bread heated up. Just do it.
Fin.


Photos by Ben : heliotrope.ucsd.edu

Wednesday, August 11, 2010

Orangey tart flavor explosion experiment

Usually, baking for me is like science. It's not fun, and it ends up not working. Such is life. Somehow, though, I managed to make a damn good tart the other day! Success!


The story always comes back to... Amy, why did you leave work early to bake a tart anyway? I wish I could give you a good answer. Turns out, science is boring. And frustrating, hence my blog's title. Cooking rarely is either of these things.

Oh, and also, today I failed miserably at filling one of the new camelback water holder things, slipped in 40oz of water on the floor in a sad attempt to get the phone (I didn't) and I think I broke my toe. That's besides the point. It's been a not so good day, and the only comment I got on here was admittedly my boyfriend masquerading as someone else.

But on!

Orangey tart with graham cracker crust
Serves about 8 large slices
  • 8 graham crackers
  • 3 Tbsp salted butter
  • 6 Tbsp fat free greek yogurt, 2 for the crust, 4 for the filling
  • 5 jumbomax eggs (mine had a double yolk!!)
  • 1/2 cup orange juice (low pulp, but who knows if it matters... it's just what was in the fridge) 
  • 3/4 cup white granular sugar
  • 1/2 cup flour
  • pinch salt
  • 1 Tbsp vanilla extract (none of that fake stuff - only real vanilla for my kitchen sink tart!)
  • I think that's it...
For crust, crush graham crackers into a fine pulp (I used my brand new mortar and pestle!). Mix with melted butter and 2 Tbsp greek yogurt. Work into a paste and squish into a tart pan. Bake at 350F for about 10 minutes.


For filling, take all of the rest of the ingredients, put in a bowl, and electric beat them to DEATH until foamy and delicious. Pour into tart pan, and bake at 350 for about 15 minutes. Turn off oven, and let tart cool in the closed oven.

Slice and keep away from hungry boyfriend. Seriously.

Healthy AND delicious this time! Annnnnd it doesn't look like dog poop/slop! Woohoo!

Photos by Ben : heliotrope.ucsd.edu

Thursday, August 5, 2010

Better than Hot Pockets Experiment

So, I have a confession to make. I am not proud of this, but I finally had one of my biggest childhood food desires EVER for the first time 2 days ago.

I've been counting calories for a couple of weeks now, and I guess my body just had ENOUGH, took over my wallet, and bought a frozen 1/2 pound meatwad of affliction. Aka a Hot Pocket.


When I took the paper towel-wrapped pastry out of the lab microwave and saw the fluorescent orange cheese residue that had exploded out of the pocket, I knew in the back of my mind that I was in for some gastronomical distress. It was like napalm, and didn't taste much better. Soggy pastry, liquid orange that I doubt would fit into any category of cheese, and peach colored... ham. Well, needless to say I ate the whole thing. After this Hot Pocket debacle, went to track practice and fought my way around the dirt track over and over, feeling the lump of sadness that was the "pastry" bouncing around my stomach.


I vowed to avenge the filled pastry. I KNEW I could make something 3000x better. And I did.

The best pizza crust/bread stick recipe I've ever had
Makes dough for 1 pizza, and it made 8 hot pockets
  • 1 packet active dry yeast
  • 1/4 cup olive oil
  • 1 Tbsp salt
  • 1 Tbsp thyme
  • 1 head garlic
  • 3 cups flour
  • 1 1/4 cup warm water 
Mix yeast, warm water, salt, and olive oil in a large bowl. Add in garlic and thyme. Stir in flour, and allow to rise for 1.5-2 hours. If you want pizza dough, stretch it. If you want bread sticks, do that, but if you want HOT POCKETS, cut into 8 pieces and set aside.

Hot Pockets!
  • Horseradish cheddar
  • Sliced cooked deli ham
  • Italian sausage, chopped and cooked
  • Mushrooms, white, chopped and cooked with sausage
  • Mexican shredded cheese blend
  • Barbeque sauce
  • Premade pizza dough (see above) 
Preheat oven to 400 degrees.

Stretch dough into 8x4 inch rectangles. It will end up quite thin. Spoon filling into center in a line. Fold dough over the fillings and pinch to close. Pat a bit with your hands to get the shape more normal. Top with a bit of shredded cheese, and bake about 15 minutes. 

Nom nom. 


Photos by Ben : heliotrope.ucsd.edu

Wednesday, August 4, 2010

Ravioli without a roller experiment with seared scallops

Scenario : Romantic dinner for dos, pound of fresh mexican scallops, and a strong desire to make something remarkable. Also, love making my cat jealous.


Result : Something romantic, that needs serious honing. And the acquisition of a pasta roller. And losing half of the bacon fat to greedy cat.

What would I do differently to make this experiment more successful next time?
1. Pasta roller so the dough isn't so... thick
2. Leave the peas out of the ravioli and put only on top of dish
3. Slice scallops into thinner rounds
4. Omit brown butter sauce


Bacon, sweet pea, and goat cheese ravioli with thyme and bacon seared scallops
Serves about 10 people portions of 4 ravioli. Or, for us, 2 people 3 portions each until sick of leftovers, and then 4 portions to my garbage disposal

  • Can sweet peas
  • 4-5 slices thick cut bacon
  • 11oz goat cheese (non seasoned)
  • Leaves from several sprigs of fresh thyme
  • Fresh diver scallops
  • 1 Tbsp salted butter 
  • 2 eggs
  • 1.5 cups semolina flour
  • Truffle oil (as if I could ever not use this)
    Cook bacon until quite crispy, but not burnt. Reserve fat for searing scallops.

    Prepare pasta dough by mixing eggs, salt, pepper, and semolina. Allow to sit for a good 20-30 minutes in the fridge before using. Roll dough in a roller, if you're not me. If you ARE me, roll it on the table with a rolling pin. You want the dough pretty thin, but not overly so. Otherwise it will rip when you fill your ravioli.


    Fill ravioli with bacon, goat cheese, thyme, and peas. Or not peas if you're smarter than I am. Which you are, if you're reading this.

    Wash scallops well, and pat dry. Having the flesh dry is a must for getting a good sear. Trying to sear something that is wet will lead to overcooked seafood with no crispy exterior. Sprinkle salt and pepper on the scallops relatively liberally, as a lot of it will end up falling off as you sear them.

    Into a pan of hot bacon fat, over about 300 degree heat (sorry, I used an electric griddle), place each scallop flat side down. I like to take my finger and push the scallop in a circle in the fat to ensure coverage on the bottom, but that's really up to you. Cook about 2 minutes on each side, or until scallop has gone from a clearish color to a more opaque, and has nice caramel color on the sear.

    Plate it up all pretty, light some candles, and chomp away!

    Photos by Ben : heliotrope.ucsd.edu